Connect AWS
Summary
Connect AWS accounts to Costimizer for billing analysis, resource discovery, and optimization recommendations.
Required role: Organization Manager or Manage Cloud Credentials
Estimated time: 15–30 minutes depending on CUR setup
Navigate to Accounts → Connect Cloud Account → AWS.
- Assumed Role (Recommended)
- Root Account (AWS Organizations)
- Linked Account
Why this method
Assumed Role is the recommended way to connect to AWS. It uses temporary credentials; no long-lived access keys are stored anywhere. Costimizer assumes a role in your account using AWS Security Token Service (STS), which means access can be revoked instantly if needed. It also follows AWS best-practice guidance for cross-account access.
Prerequisites (AWS Billing Data Export)
You must configure a Billing Data Export in AWS before connecting. Costimizer reads billing data from an S3 bucket — it does not use the AWS Cost Explorer API directly.
Step-by-step: Configure billing export
- Log in to the AWS Console.
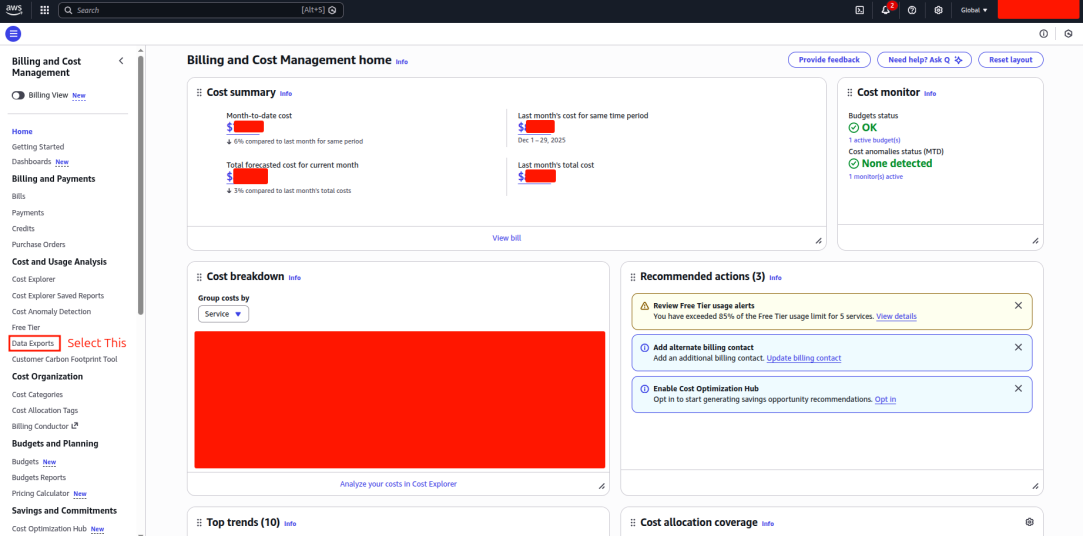
- Go to AWS Billing & Cost Management.
- Navigate to Data Exports.
- Click Create and select Standard Data Export (CUR 2.0). This is the recommended format. Legacy CUR is also supported but not advised.
- Configure the export settings:
- Enable Include resource IDs
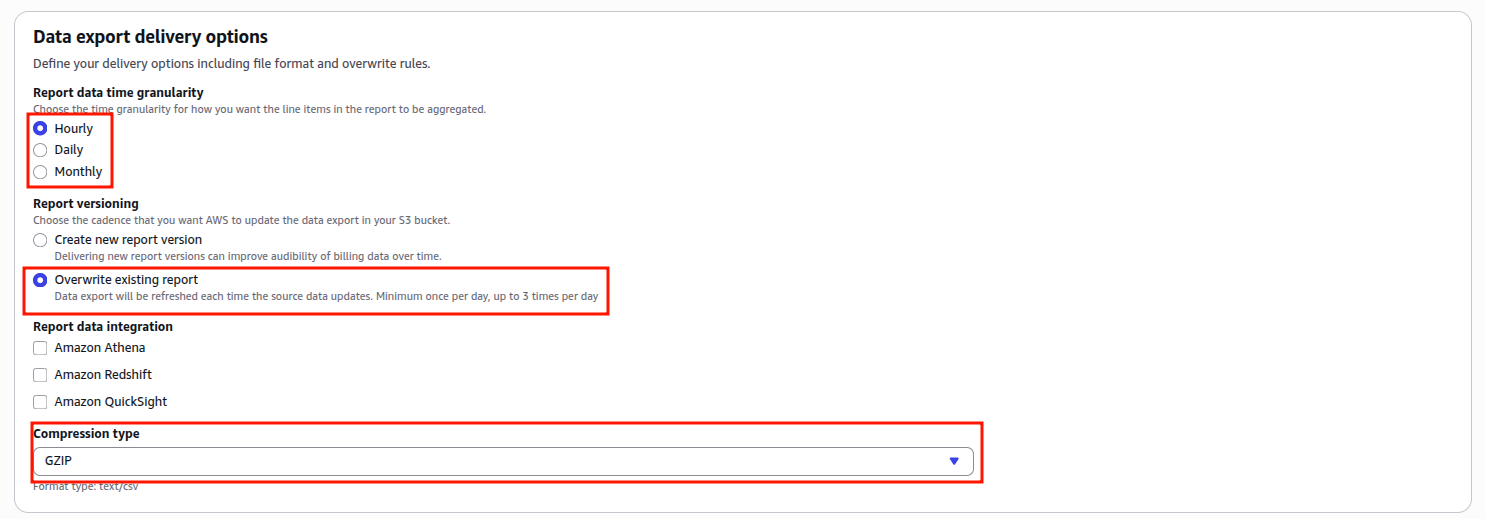
- Set time granularity to Hourly or Daily (Hourly recommended)
- Enable Overwrite existing export files

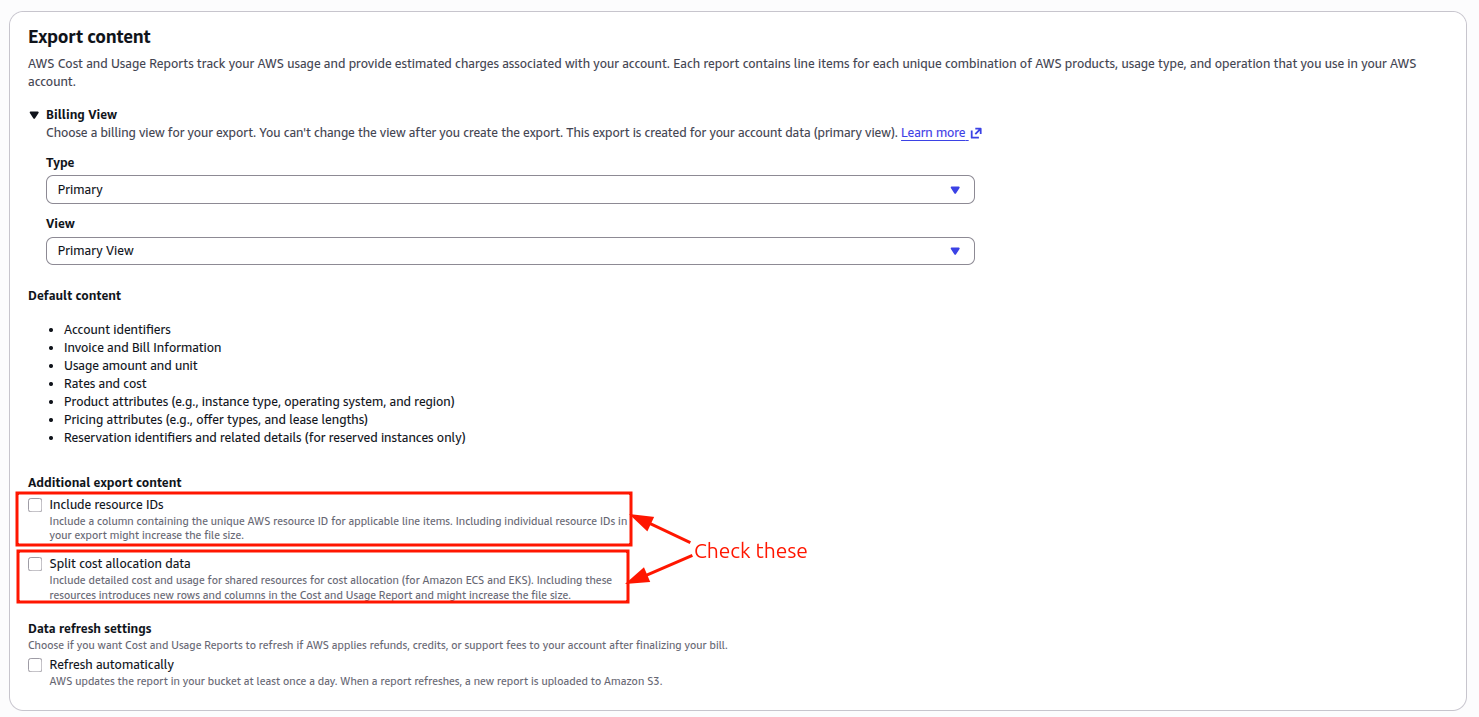
- Choose or create an S3 bucket and set an S3 path prefix.

- Review and confirm the export creation.

Billing exports are usually ready within 24 hours of creation.
Create the IAM Role in AWS
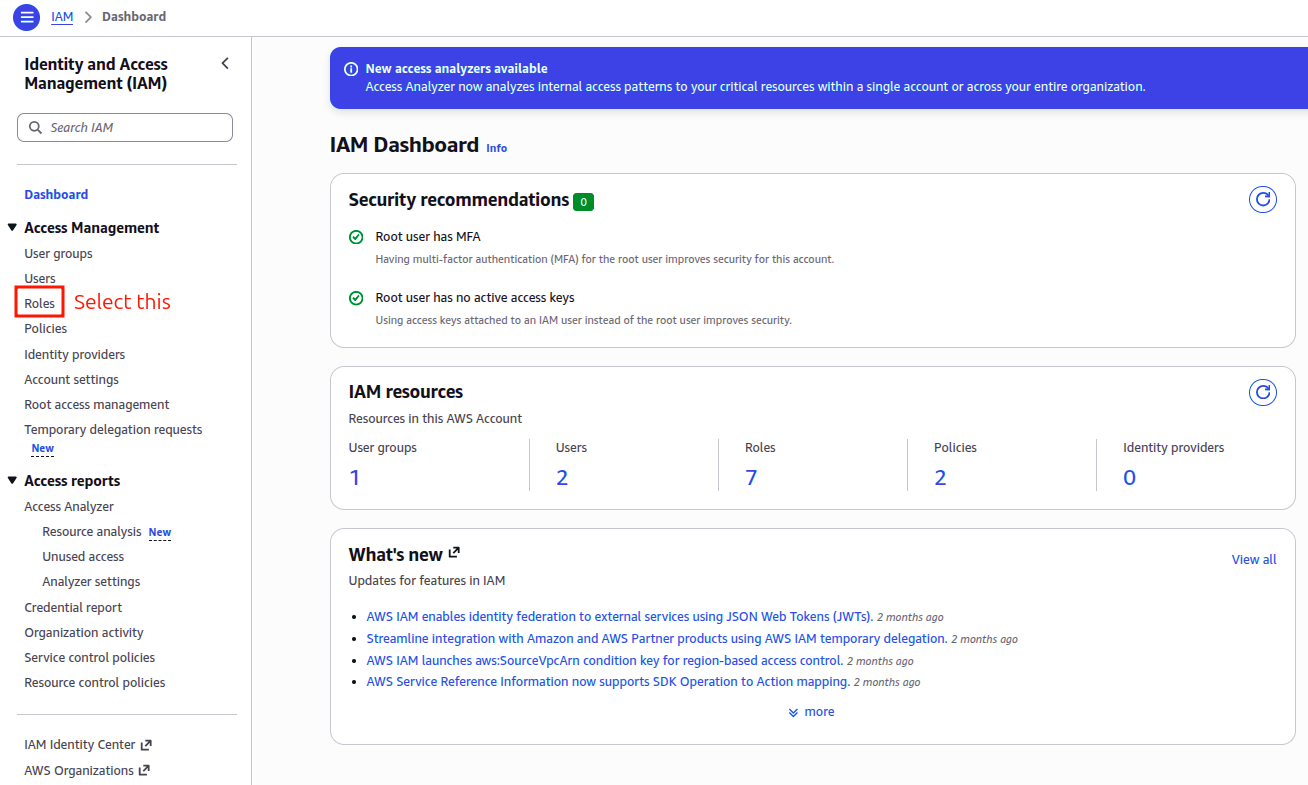
- In AWS Console, go to IAM → Roles → Create role.
- Select Trusted entity type: AWS account → Another AWS Account.
- Enter the Costimizer Access Account ID (provided by Costimizer).
- Give the role a recognisable name, for example:
CostimizerCrossAccountRole. - Attach a read-only policy covering:
- AWS Billing & Cost Management
- S3 (the billing export bucket)
- EC2, ELB, CloudWatch (read-only)
- Cost & Usage Reports / Data Exports
- Complete role creation.
Trust Policy JSON:
{
  "Version": "2012-10-17",
  "Statement": [
    {
      "Effect": "Allow",
      "Principal": {
        "AWS": "arn:aws:iam::<COSTIMIZER_ACCOUNT_ID>:root"
      },
      "Action": "sts:AssumeRole"
    }
  ]
}
Connect in Costimizer UI
- Log in to Costimizer.
- Go to Accounts in the left menu.
- Click Connect Cloud Account.
- Select AWS, then choose Assumed Role as the connection type.
- Fill in the following fields:
- Name — a label for this account (e.g.,
AWS Production) - AWS Account ID — your target AWS account ID
- Assumed Role Name — the name of the IAM role created above
- Export Type — select Standard Data Export (CUR 2.0) or Legacy CUR
- Export Name — the name you gave your billing export
- S3 Bucket Name — the bucket where billing data is stored
- S3 Path Prefix — the folder path within the bucket
- Export Region — the AWS region of the S3 bucket
- AWS EDP (Enterprise Discount Program) — check this box if applicable
- Name — a label for this account (e.g.,
- Click Connect.
What happens next
Billing data ingestion starts automatically after the connection is verified. The first data usually appears within a few hours. Full CUR data can take up to 24 hours, depending on when AWS last generated your billing export.
When to use
Use this method if billing is managed centrally through AWS Organizations and you want to onboard the Payer (Root) account. The Root account owns the consolidated bill for all linked accounts in your organisation.
Costimizer imports costs only for accounts that are explicitly connected. Even if a linked account appears in the Root billing export, its costs will not appear in Costimizer until that linked account is also onboarded separately.
Prerequisites
- AWS Organizations is enabled
- You have access to the Root (Payer) Account
- A Billing Data Export is configured (same steps as the Assumed Role guide above)
- An S3 bucket is available for billing data
- You have permissions to create IAM users and attach policies
Create an IAM User with read-only access
Create a policy that allows Costimizer to read objects from your billing S3 bucket:
{
  "Version": "2012-10-17",
  "Statement": [
    {
      "Sid": "AllowCostimizerBucketRead",
      "Effect": "Allow",
      "Action": ["s3:GetObject", "s3:ListBucket"],
      "Resource": [
        "arn:aws:s3:::<YOUR_BILLING_BUCKET>",
        "arn:aws:s3:::<YOUR_BILLING_BUCKET>/*"
      ]
    }
  ]
}
Steps:
- Go to IAM → Users → Add user.
- Enter a username (e.g.,
CostimizerRootAccess). - Select Programmatic access.
- Attach the billing & S3 read-only policy created above.
- Add the AWS managed ReadOnlyAccess policy for resource discovery.
- Complete creation and download the Access Key ID and Secret Access Key.
Keep these credentials safe — the Secret Key is shown only once.
Connect in Costimizer UI
- Log in to Costimizer and go to Accounts.
- Click Connect Cloud Account → AWS → Root.
- Fill in:
- Name — a label (e.g.,
AWS Root — Production Org) - AWS Account ID
- Access Key ID and Secret Access Key
- Export type, Export name, S3 bucket name, S3 path prefix, Export region
- Name — a label (e.g.,
- Click Connect.
When to use
Use this to add an individual AWS member account from your organisation. Linked accounts contribute resource-level data. Billing data comes through the Root account connection, so ensure the Root account is connected first.
Steps
- In the AWS Console of the linked account, go to IAM → Users → Add user.
- Username:
CostimizerLinkedAccess. - Attach the AWS managed policy:
arn:aws:iam::aws:policy/ReadOnlyAccess. - Download the Access Key ID and Secret Access Key.
In Costimizer:
- Go to Accounts → Connect Cloud Account → AWS → Linked.
- Fill in:
- Name — a label for this account
- AWS Access Key ID
- AWS Secret Access Key
- Click Connect.
If you do not want to expose full Root Account billing data, Costimizer can still extract cost data for specific linked accounts. Contact support or visit costimizer.ai/extract_linked_reports for details.
Troubleshooting
| Symptom | Fix |
|---|---|
| Connection validation fails | Verify trust policy external ID and role ARN |
| No cost data | Confirm CUR files arrive in S3; check bucket policy |
| Missing resources | Enable resource discovery permissions on the IAM role |
See Connection failures for more detail.