Connect GitLab CI/CD
Summary
Costimizer's Shared Environment CI/CD integration lets you track exactly which branch triggered a deployment, who ran it, what commit it was, and whether the pipeline passed or failed — all visible directly inside Costimizer alongside your cost data.
This guide walks you through the entire setup: creating a Shared Environment, getting your unique collector URL, and adding a single stage to your .gitlab-ci.yml that sends pipeline data back to Costimizer automatically after every run.
What you'll need
- A Costimizer account (log in at dashboard.costimizer.ai)
- A GitLab project with an existing
.gitlab-ci.ymlpipeline - Access to edit your repository's CI/CD configuration
What you'll get after this setup
Once connected, every pipeline run on your linked branch will automatically push the following data into your Shared Environment in Costimizer:
- Pipeline result — whether the run passed, failed, or was blocked
- Commit ID — the full SHA of the commit that triggered the pipeline
- Branch — the branch name (e.g.,
k8s-dev-deploy) - TriggeredBy — the GitLab username of whoever triggered the run
You'll see this data live in the Shared Environment properties section of your resource detail page, refreshed after each pipeline execution.
Start with the Shared Environments overview to learn what shared environments are and how to book them.
Step 1: Open Shared Environments
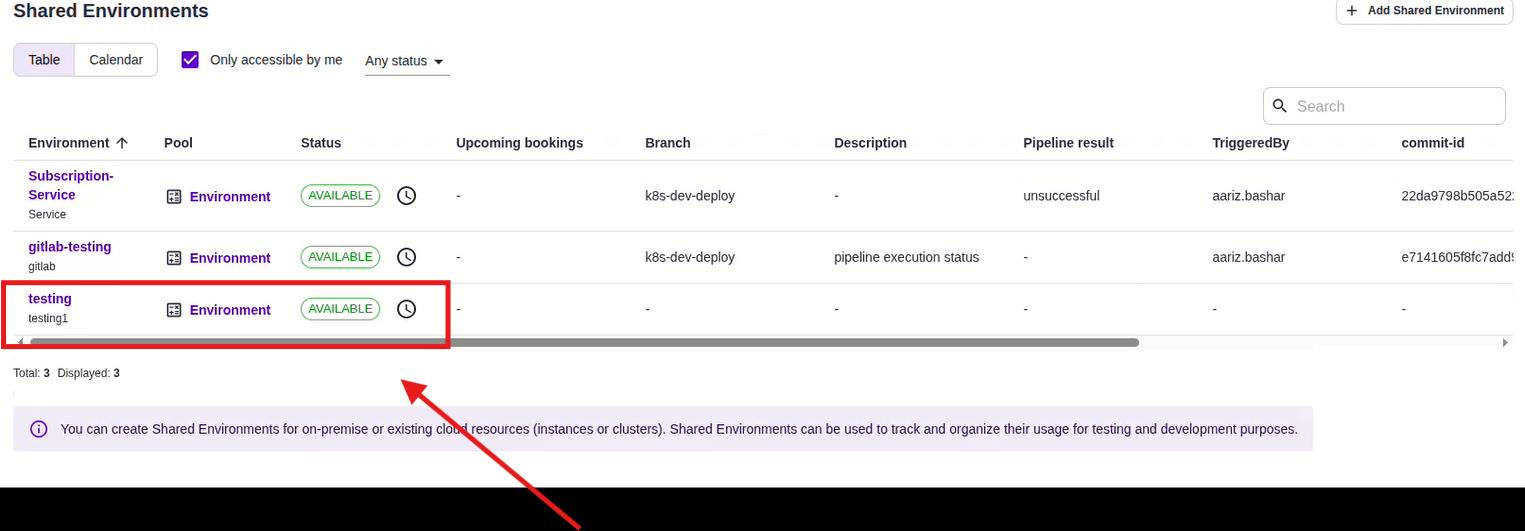
Log in to Costimizer. From the left sidebar, click Shared Environments.
You'll land on the Shared Environments list page.
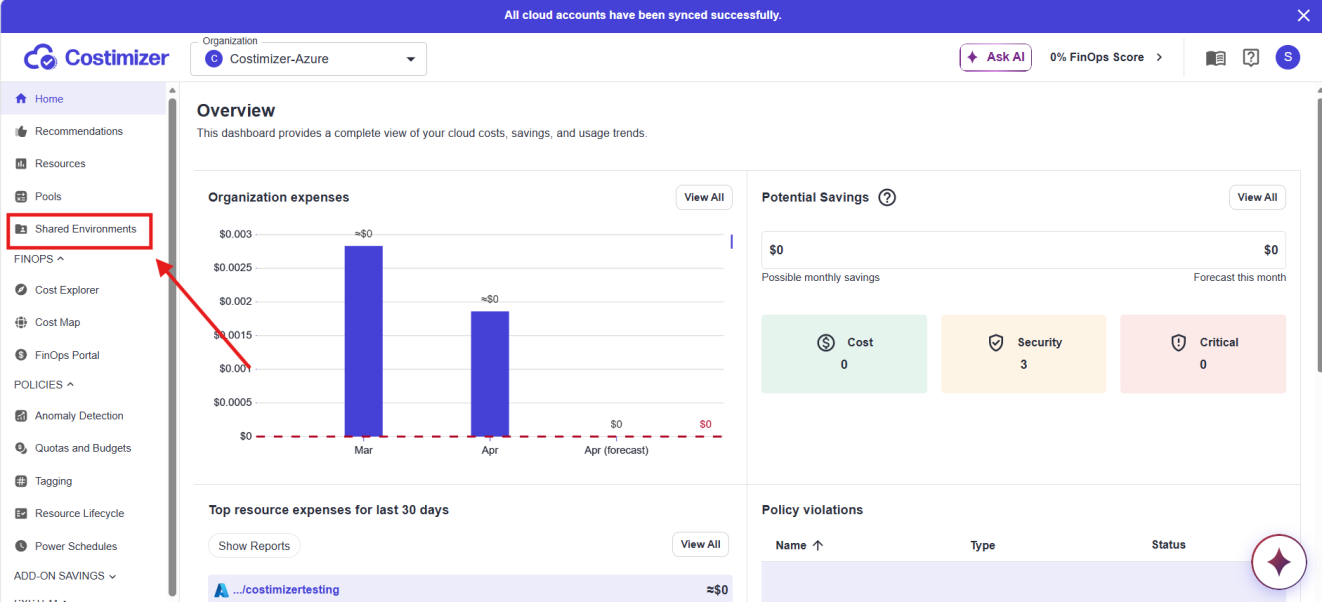
The page has two views, Table and Calendar, and a filter checkbox labeled Only accessible by me.
Any existing environments you have access to are listed here with columns for Environment name, Pool, Status, Upcoming bookings, Branch, Description, Pipeline result, TriggeredBy, and commit-id.
At this point, there may be environments already in the list (for example, Subscription-Service and gitlab-testing are visible here). The table footer shows Total and Displayed counts.
In the top-right corner, click + Add Shared Environment.
Step 2: Create a new Shared Environment
Clicking + Add Shared Environment takes you to a new page at /environments/create.
You'll see the Add Shared Environment form with the following fields:
Name (required) — Give your environment a clear, recognizable name. In the screenshot, we have used testing. Use something that maps to your service or deployment target, for example: subscription-service, payment-api, or k8s-staging.
As you type in the Name field, Costimizer's autocomplete suggests existing environment names from your organization. You can either pick one or type a new name and press Enter.
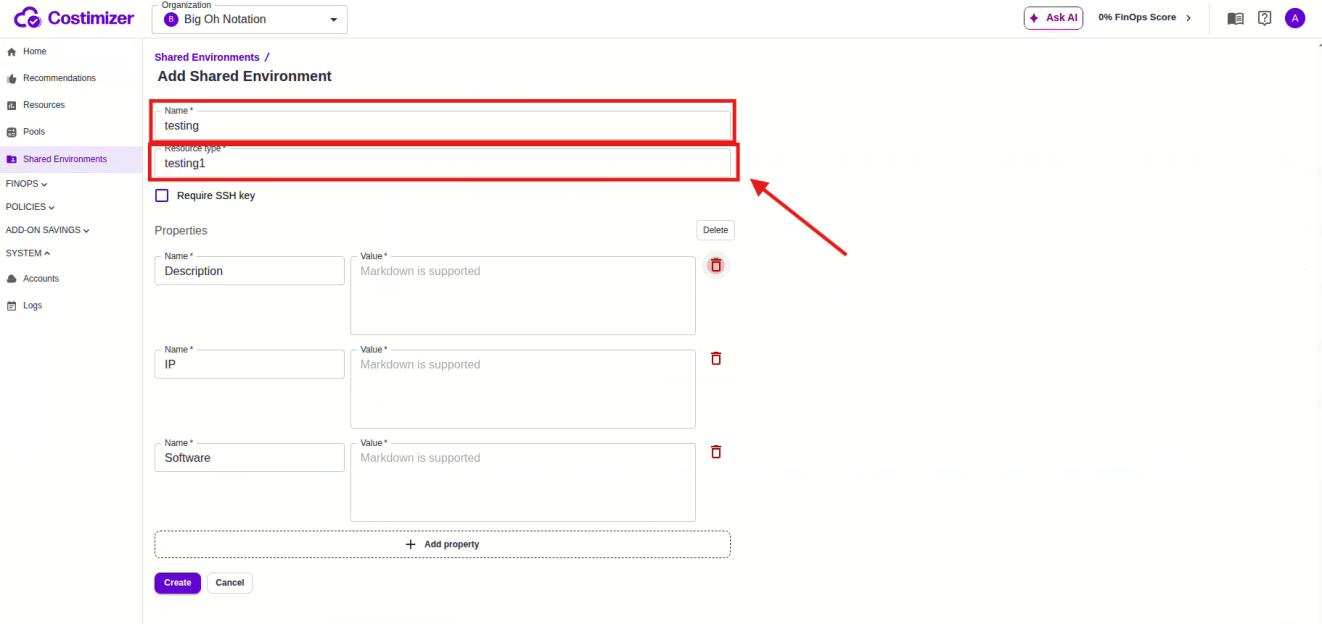
Resource type (required) — A free-text label that categorizes the type of resource this environment represents. In the screenshot, we have entered testing1 here. You can use labels like GitLab, Kubernetes, staging-cluster, or any tag that helps your team identify the environment type.
When you click into the Resource type field, Costimizer shows an autocomplete dropdown with suggestions based on existing resource types in your organization, for example: Auth-service, Diproxy - Proxy Service, Herald - Email, Web, Katara - Report Generator, gcp-powerscheduling. You can select from this list or type your own.
Require SSH key — An optional checkbox. Leave this unchecked for most CI/CD integrations unless your environment requires SSH-based access.
Properties — Below the main fields, you can add key-value properties to describe the environment. By default, three property rows are pre-populated:
- Description — a free-text description (Markdown supported)
- IP — the IP address of the environment
- Software — software version or stack info
You can delete any of these or add more using the + Add property button. Properties are flexible; use them to store any metadata that's useful to your team (e.g., region, owner, service version).
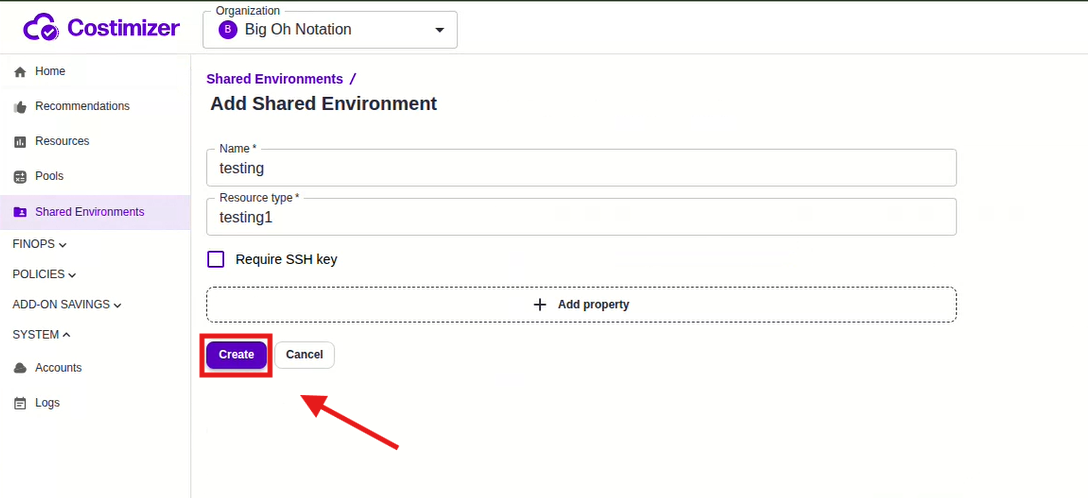
Once you've filled in the Name and Resource type, click Create.
Step 3: View your new environment
After clicking Create, Costimizer redirects you back to the Shared Environments list. You'll now see your new environment added as a third row in the table, marked AVAILABLE with a green badge.
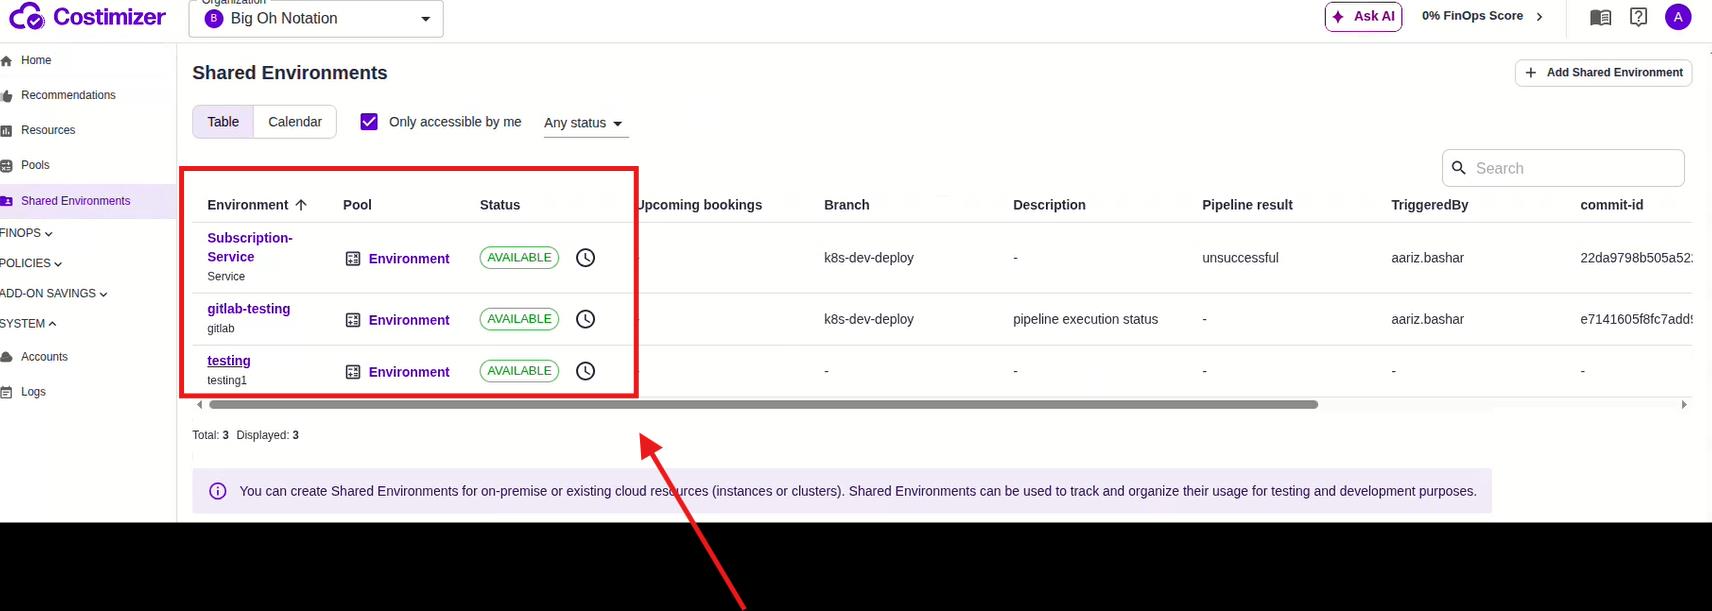
In the screenshot, after creating, the list shows:
Subscription-Service— AVAILABLEgitlab-testing— AVAILABLEtesting— AVAILABLE (newly created)
The footer updates to show Total: 3, Displayed: 3.
Click on the name of your newly created environment to open its detail page.
Step 4: Get your CI/CD collector URL
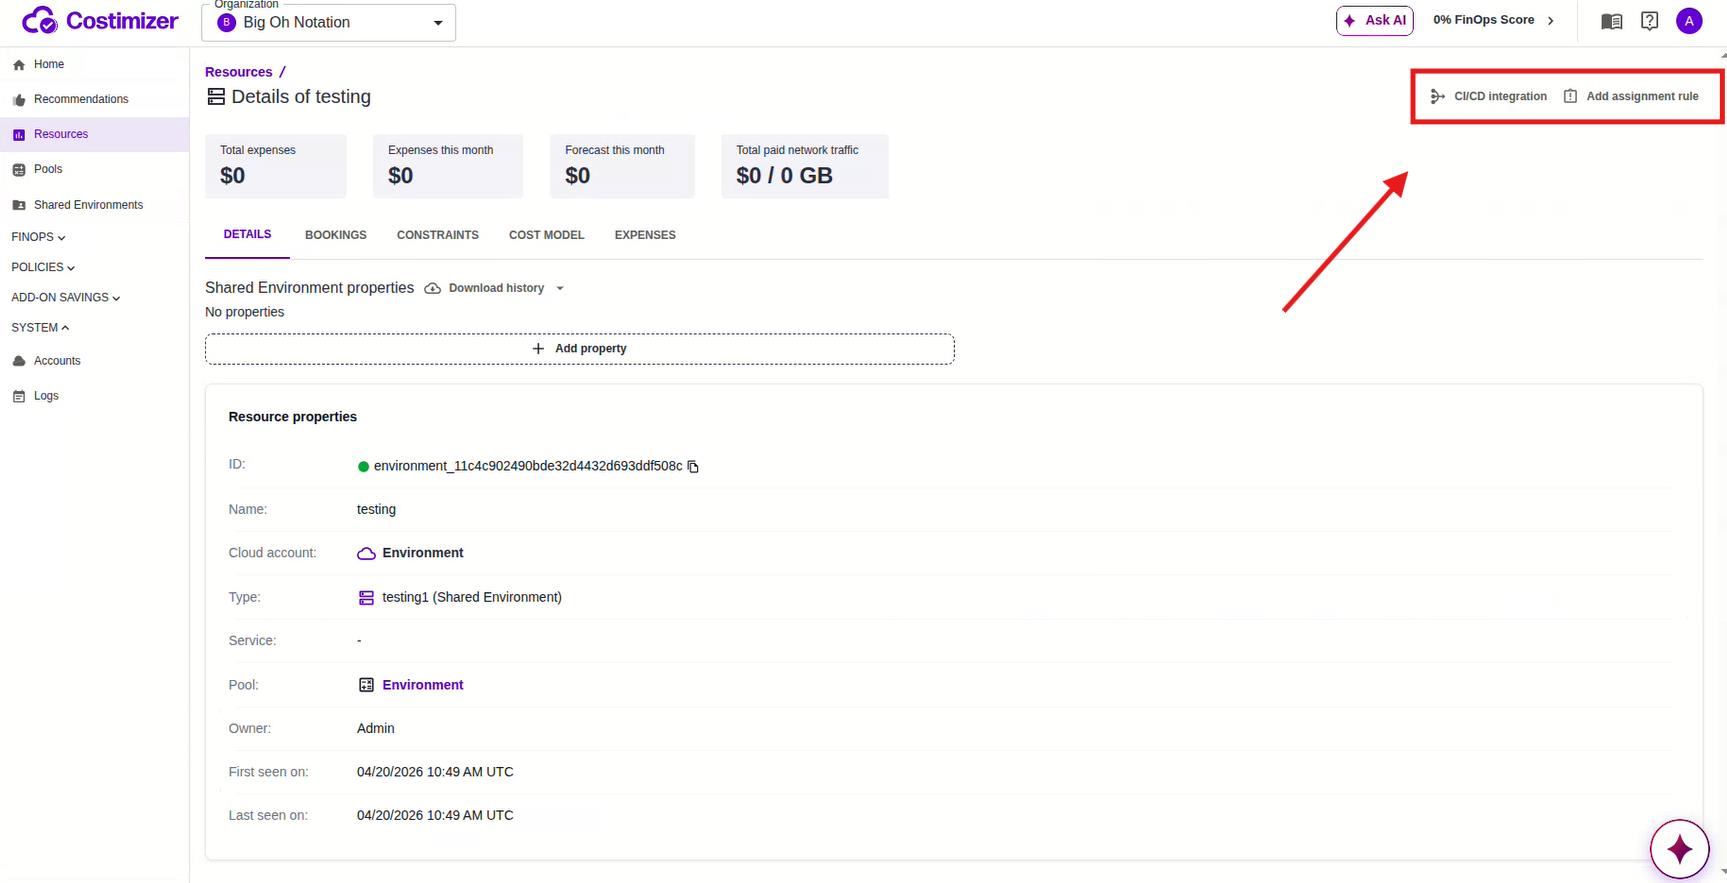
On the environment detail page, you'll see the resource name at the top (e.g., Details of testing), along with four cost metric cards: Total expenses, Expenses this month, Forecast this month, and Total paid network traffic — all showing $0 for a brand-new environment.
Below that are five tabs: DETAILS, BOOKINGS, CONSTRAINTS, COST MODEL, and EXPENSES.
In the top right of the page, you'll see two action buttons: CI/CD integration and Add assignment rule.
Click CI/CD integration.
A side panel slides in from the right with the header CI/CD Integration. This panel explains exactly what you need to do.
It says:
Properties of this Shared Environment can be set directly from your CI/CD pipelines. You need to insert the following POST request to your pipeline:
The panel shows a code snippet:
curl -X POST -d '{"<property_name>":"<value>"}' https://stg.costimizer.ai/...
It also notes that the request body must contain plain JSON with a dictionary of string key-value pairs, and that you can delete a property by passing null as its value.
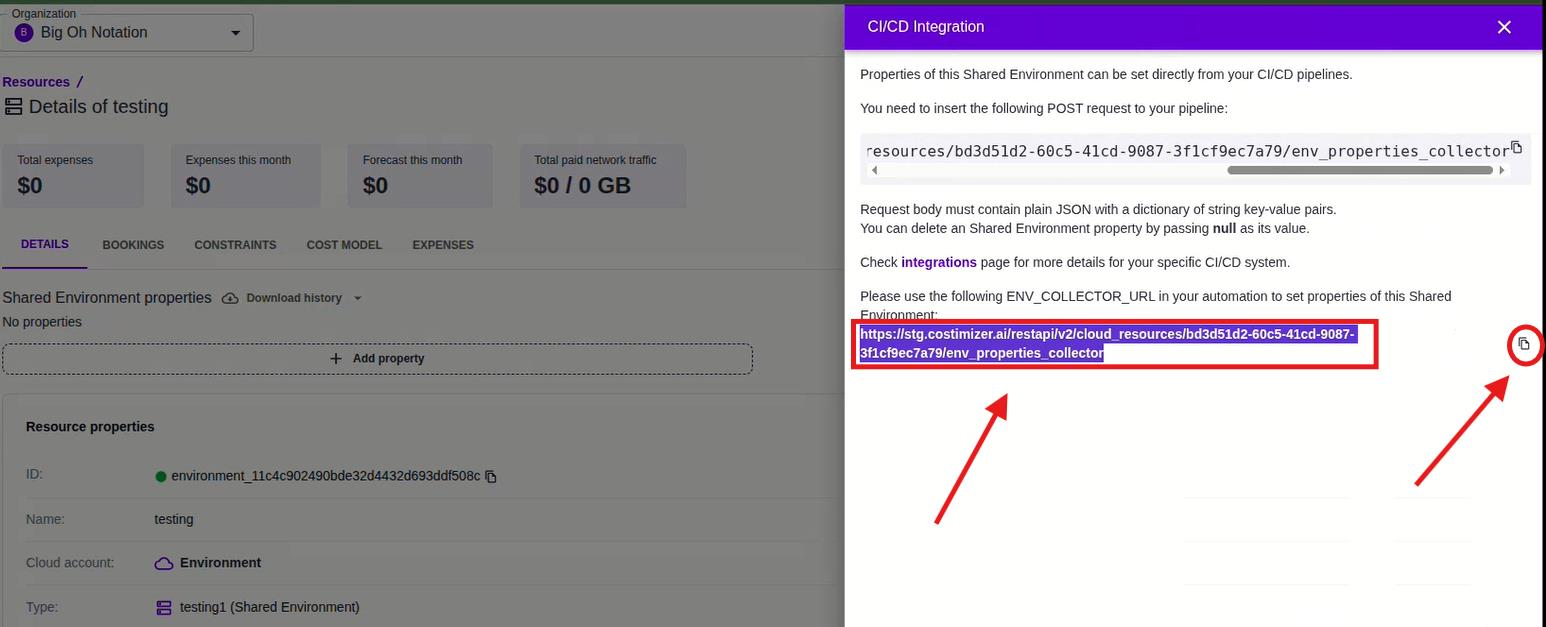
Below the snippet, the panel shows your ENV_COLLECTOR_URL, a unique URL specific to this environment:
https://stg.costimizer.ai/restapi/v2/cloud_resources/<your-environment-id>/env_properties_collector
For example, the URL shown in the screenshot is:
https://stg.costimizer.ai/restapi/v2/cloud_resources/bd3d51d2-60c5-41cd-9087-3f1cf9ec7a79/env_properties_collector
Copy this entire URL. You will paste it into your .gitlab-ci.yml in the next step.
Step 5: Update your .gitlab-ci.yml
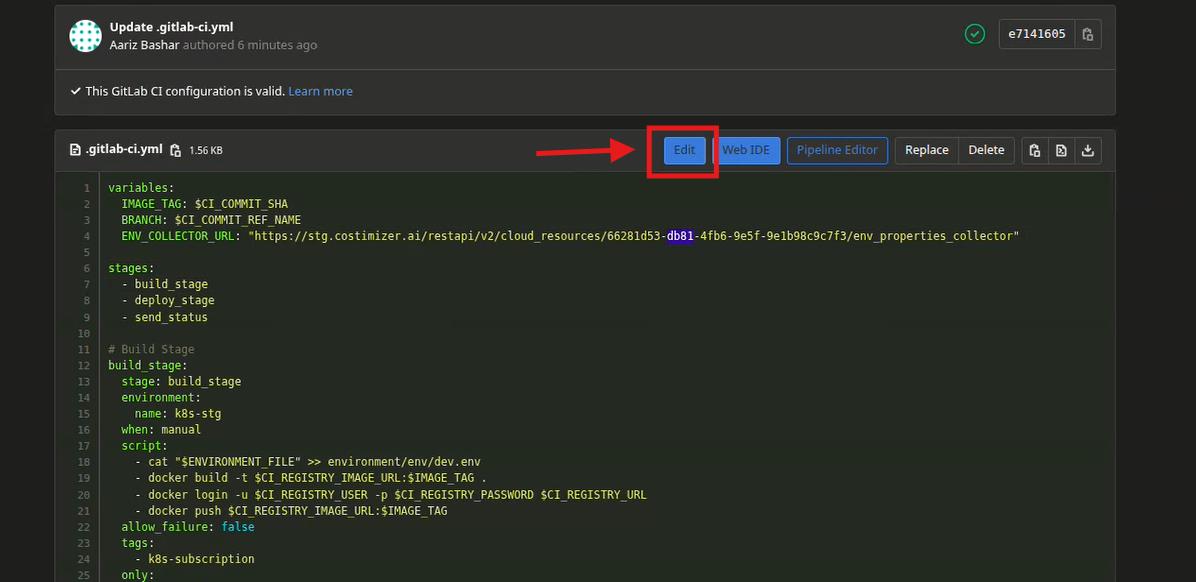
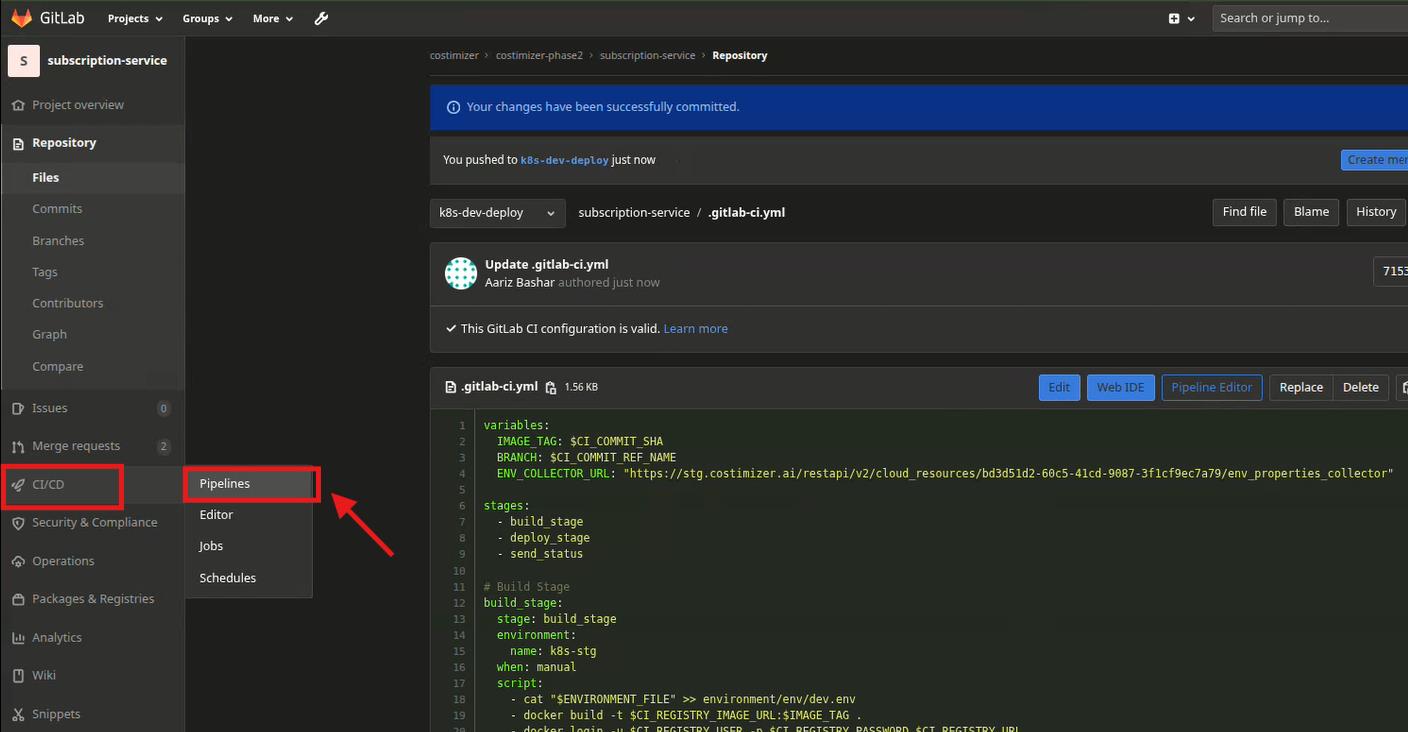
Now switch to your GitLab project. Navigate to your repository and open the .gitlab-ci.yml file.
Go to CI/CD → Pipelines, then into the repository branch (k8s-dev-deploy), and open .gitlab-ci.yml directly by clicking the filename in the file list.
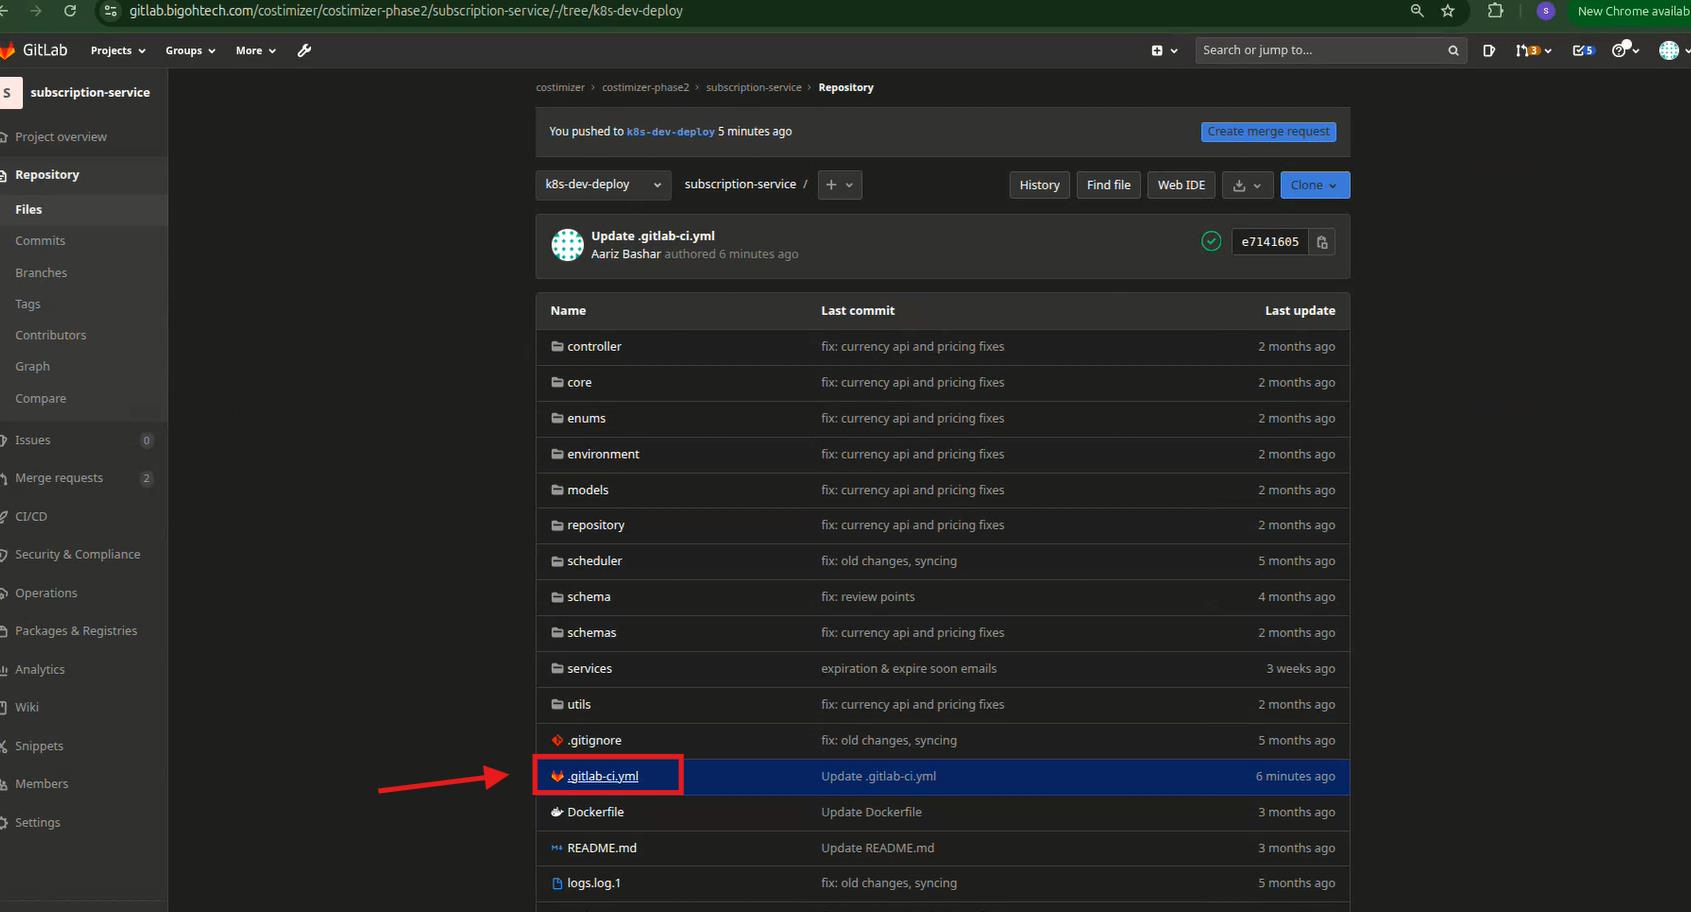
Click Edit (or open the Web IDE) to begin editing the file.
Add the ENV_COLLECTOR_URL as a variable
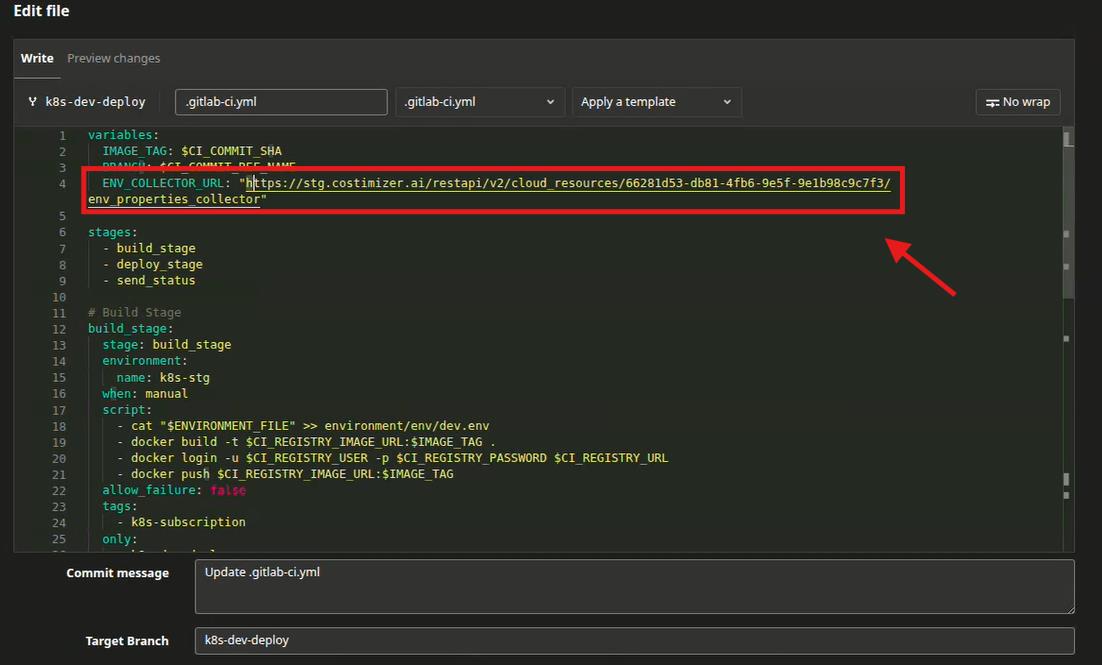
At the top of your .gitlab-ci.yml, in the variables section, add a new variable called ENV_COLLECTOR_URL and paste in the URL you copied from the CI/CD Integration panel.
In the screenshot, the variables section looks exactly like this (line 4 is the new addition):
variables:
  IMAGE_TAG: $CI_COMMIT_SHA
  BRANCH: $CI_COMMIT_REF_NAME
  ENV_COLLECTOR_URL: "https://stg.costimizer.ai/restapi/v2/cloud_resources/bd3d51d2-60c5-41cd-9087-3f1cf9ec7a79/env_properties_collector"
Replace the URL with your own collector URL from Step 4.
Add send_status to your stages list
In your stages: block, add a new stage called send_status. In the screenshot, the stages are defined as:
stages:
  - build_stage
  - deploy_stage
  - send_status
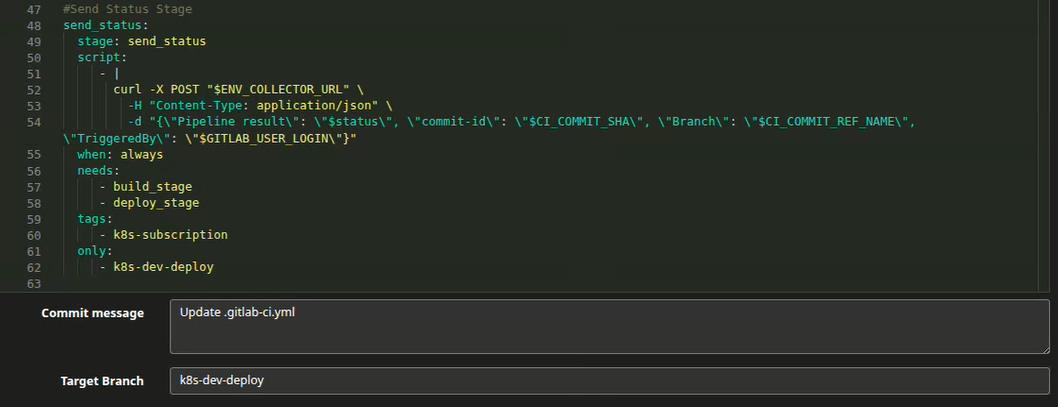
Add the send_status job
Add the following job to your .gitlab-ci.yml. This is the job that fires a POST request to Costimizer after every pipeline run, sending the pipeline result, commit SHA, branch name, and who triggered it.
# Send Status Stage
send_status:
  stage: send_status
  script:
    - |
      curl -X POST "$ENV_COLLECTOR_URL" \
        -H "Content-Type: application/json" \
        -d "{\"Pipeline result\": \"$CI_PIPELINE_STATUS\", \"commit-id\": \"$CI_COMMIT_SHA\", \"Branch\": \"$CI_COMMIT_REF_NAME\", \"TriggeredBy\": \"$GITLAB_USER_LOGIN\"}"
  when: always
  needs:
    - build_stage
    - deploy_stage
  tags:
    - k8s-subscription
  only:
    - k8s-dev-deploy
A few things to note about this configuration:
when: always— ensures the status is sent to Costimizer whether the pipeline passed, failed, or was cancelled. You always want the data reported.needs: [build_stage, deploy_stage]— the status job waits for both the build and deploy stages to finish before it fires.- The
-dbody sends four key-value pairs to Costimizer:Pipeline result,commit-id,Branch, andTriggeredBy. - Replace
k8s-subscriptionintags:andk8s-dev-deployinonly:with your own runner tag and branch name.
Use $CI_PIPELINE_STATUS (not $status) so GitLab sends the actual pipeline status (success, failed, or canceled) to Costimizer. Without a valid GitLab predefined variable, the Pipeline result property will not appear in Costimizer.
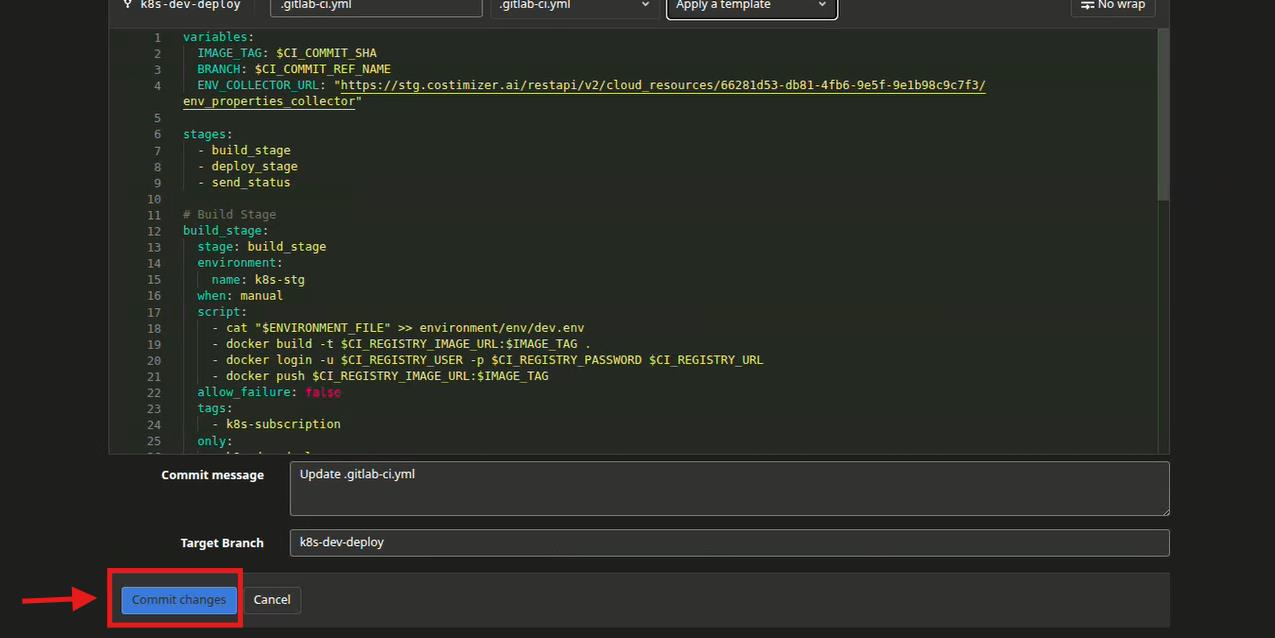
Commit the changes
At the bottom of the edit page, you'll see two fields:
- Commit message — pre-filled with
Update .gitlab-ci.yml(you can keep this or write your own) - Target Branch — set to your current branch (e.g.,
k8s-dev-deploy)
Click Commit changes. GitLab will immediately trigger a new pipeline run.
Step 6: Watch the pipeline run
After committing, navigate to CI/CD → Pipelines in your GitLab project. You'll see a new pipeline at the top of the list with a running status badge.
The pipeline in the screenshot runs through three stages (shown as three circles in the Stages column):
build_stage— passes (green tick)deploy_stage— passes (green tick)send_status— passes (green tick)
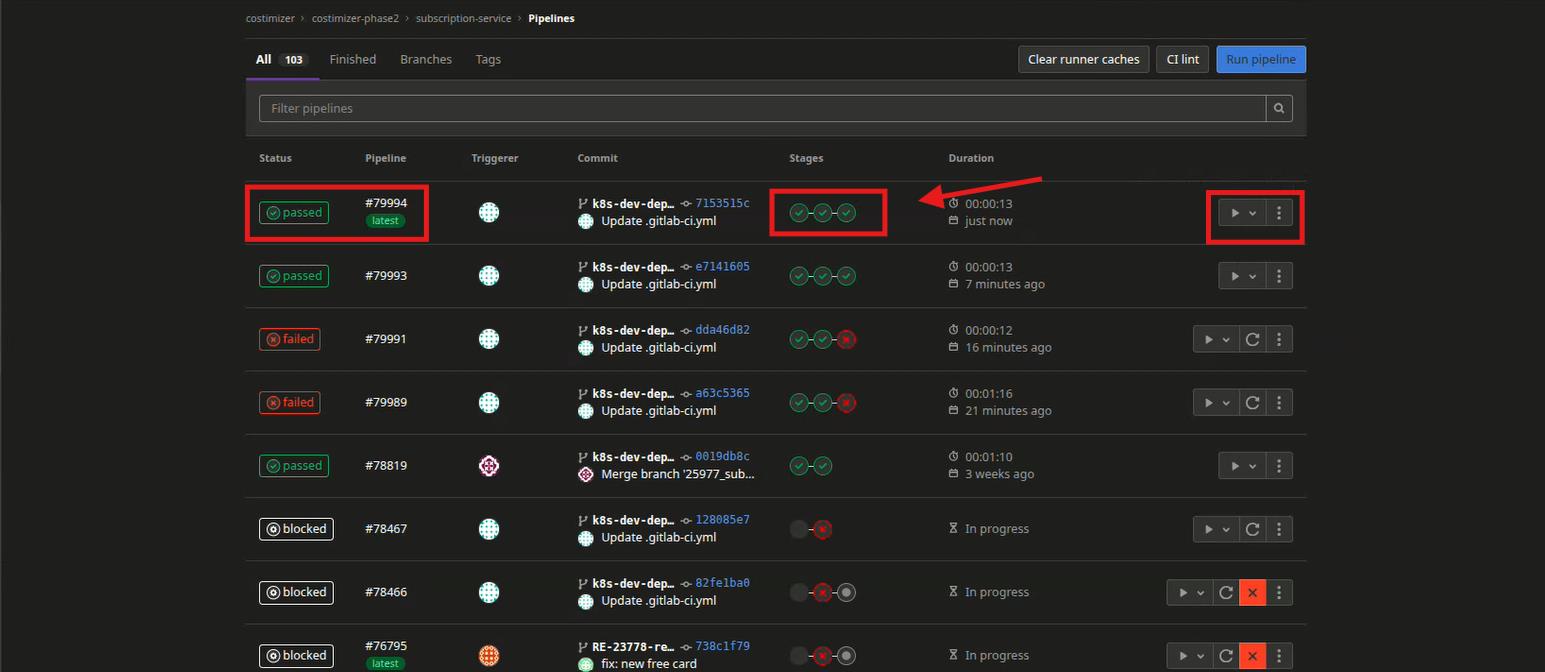
The pipeline completes in a few seconds, and its status changes to passed.
Step 7: Confirm the data in Costimizer
Switch back to Costimizer and return to your Shared Environment's detail page (Shared Environments → your environment name).
Scroll down to the Shared Environment properties section. You'll now see properties automatically populated by the pipeline:
| Property | Value (example) |
|---|---|
| Pipeline result | success (or failed / canceled) |
| commit-id | 7153515c6be18c34ec2ad1e4a3668374076564f6 |
| Branch | k8s-dev-deploy |
| TriggeredBy | aariz.bashar |
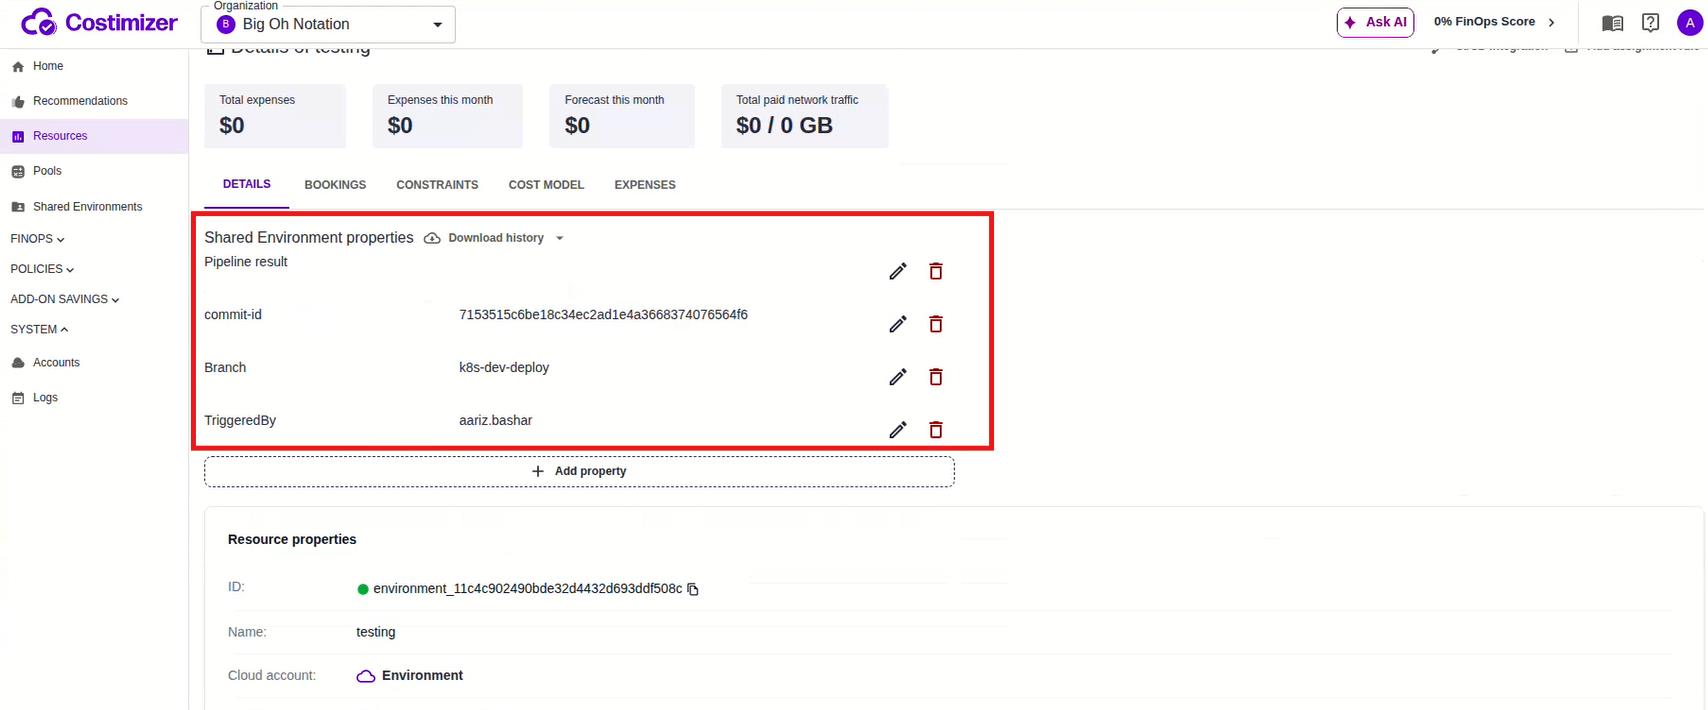
These properties are updated automatically whenever your pipeline runs. Every new commit will overwrite the previous values, giving you a live snapshot of your environment's last deployment.
A banner at the top of the page will also confirm: "All of the connected data sources passed their initial expenses processing."
How it all works together
Here's the complete picture of what happens when your pipeline runs:
- A developer pushes a commit to the
k8s-dev-deploybranch in GitLab. - GitLab triggers the pipeline, running
build_stage→deploy_stage→send_status. - The
send_statusjob fires acurl -X POSTto yourENV_COLLECTOR_URL. - The POST body contains the pipeline result, the commit SHA, the branch name, and the triggering user, all in JSON.
- Costimizer receives the request, parses the key-value pairs, and updates the Shared Environment properties in real time.
- You can now see exactly what was deployed, when, and who triggered it — right next to your cost data.
Troubleshooting
| Issue | Resolution |
|---|---|
send_status job fails with a connection error | Check that ENV_COLLECTOR_URL was pasted correctly with no line breaks or extra characters. The full URL should be a single unbroken string in the variables: section. |
| Properties aren't showing up in Costimizer | Make sure the when: always flag is set on the send_status job — without it, the job won't run if a previous stage fails. Also confirm that the -H "Content-Type: application/json" header is present in your curl command. |
| Pipeline result property is missing | Use $CI_PIPELINE_STATUS in the JSON body instead of $status. $status is not a GitLab predefined variable. |
| The pipeline ran, but I see stale data | Costimizer updates the properties on every run. If you see old values, the most recent pipeline may not have included the send_status stage — check the pipeline's stages list in GitLab to confirm all three stages ran. |
| I want to send additional data to Costimizer | Extend the JSON body in the curl command to include any extra key-value pairs. For example, to add a deployment environment tag: -d "{\"Pipeline result\": \"$CI_PIPELINE_STATUS\", \"commit-id\": \"$CI_COMMIT_SHA\", \"Branch\": \"$CI_COMMIT_REF_NAME\", \"TriggeredBy\": \"$GITLAB_USER_LOGIN\", \"Environment\": \"staging\"}". The new key will appear as a new property row in your Costimizer Shared Environment. |
What's next
Now that your GitLab pipeline is connected to a Shared Environment, here are a few things you can do to get more value out of the integration:
- Add Bookings — Use the BOOKINGS tab on your environment detail page to schedule when this environment is in use, so Costimizer can track idle vs. active periods.
- Set Constraints — Use the CONSTRAINTS tab to define usage limits or SLAs for this environment.
- Create an Assignment Rule — Click Add assignment rule on the detail page to automatically assign costs to the right team or project based on deployment activity.
- Connect Multiple Environments — Repeat this process for each service or deployment target. Each one gets its own unique
ENV_COLLECTOR_URL, so you can track staging, production, and development environments separately. - Explore the Cost Model tab — Once your environment has accumulated some deployment data, the COST MODEL tab will help you understand how pipeline activity correlates with your cloud spend.
Support
If you run into any issues or need help setting this up for a different CI/CD tool, reach out to the Costimizer support team at contact@costimizer.ai or book a live walkthrough at dashboard.costimizer.ai/live-demo.